FIG. 16
Section 5:
Removing The Gearbox Components
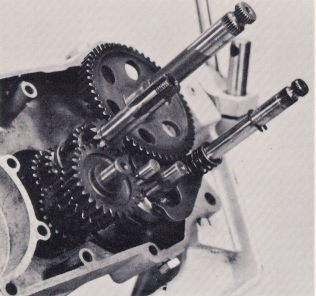
1. Turn the right hand engine case so that the transmission shafts
are pointed upward at a 450 angle (Fig. 16). Remove the center case gasket
and throw it away. Lift off the slotted plastic breather tube.
FIG. 16
2. Rotate the kick starter shaft clockwise until you can pull the whole assembly out of the right hand engine case. Lift the assembly out, making sure you have not lost any of the shim washers on either end of the shaft.
3. Remove the selector shaft by pulling it straight out. There are normally no shim washers on the right end of the selector shaft.
4. It is easiest to remove the remainder of the gearbox components as.a
unit. To do this, grasp the layshaft and mainshaft with your left hand
and the shift drum and shift fork shaft
with your right hand. You should now be able to surround this cluster
of parts by extending your thumbs and fingers around them. With a smooth
steady pull, lift the whole assembly up and out of the right hand engine
case as shown in Figure 17. The far right hand gear on the mainshaft will
remain in the case. This is the 5th driven gear. Check the mounting bosses
on the right hand case for shims. Be very careful not to lose or mix-up
any of the shimming washers.
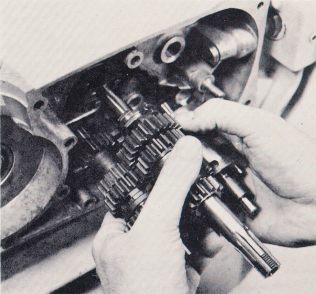
FIG. 17
5. Remove the two needle bearings and spacer from the inside of the
5th driven gear. Using a mallet and a chisel, pry up the sprocket nut tab
washer on the outside of the right engine case. Fit the appropriate OSSA
gearbox sprocket spanner to the sprocket. Part No. UD10-999-207 is used
for 12 tooth sprockets. Part No. UD11-999-207 is used for 11 and 13 tooth
sprockets. As shown in Figure 18, using the OSSA sprocket nut wrench No.
999-205, rotate the sprocket nut clockwise to loosen it.
Page 10