Part A: ENGINE
Part A will cover the disassembly, repair, and reassembly of the engine
and its components. The instructions are sequenced so that they cover a
complete engine repair. However, if you desire to service only one particular
component of the engine, and it does not require complete disassembly of
the engine, refer to the chapter and section that pertains to that component.
It is advisable to clean the entire motorcycle before removing the
engine. It is easier to work on a clean motorcycle, and always results
in a more efficient, satisfying repair job.
Locate or grind large screwdrivers so that their tips will fit the
OSSA engine screws perfectly. Failure to do this will result in damage
to the screw heads and just make the chore of their removal and replacement
more difficult. Most cycle shops sell impact screwdriver kits which allow
you to loosen and tighten engine screws efficiently and without damage
to them.
CHAPTER 1:
DISASSEMBLY OF THE ENGINE
Section 1:
Removing The Cylinder And Piston
1. Clean the exterior of the engine carefully, and if it is going to be
completely disassembled, drain the oil from the gearbox by removing the
17mm plug from the bottom side of the engine cases. After removing the
plug, slowly tilt the engine from right to left and from front to back.
This will allow the oil to reach the drain hole from behind the several
obstructions which would normally block its flow. After the oil has been
allowed to drain from the engine, check the condition of the drain plug
gasket and, replace it with a new one if needed. Reinstall the drain plug
and tighten it.
2. Remove the spark plug.
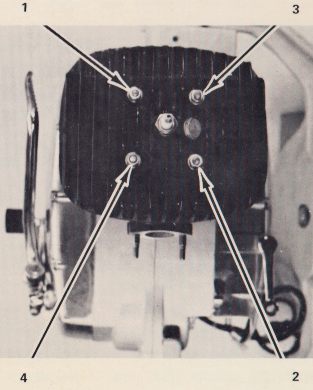
FIG. 1
3. From the top of the cylinder head, viewing the front of the head
as being 12 o'clock on the face of a clock, use a 12mm socket to loosen
the four cylinder head nuts 1/4 turn each in the following sequence:
Page 1